はじめに
本記事は、intel RealSenseとOpen3Dを使用して、カラー画像と深度画像を取得します。
RealSense公式上のサンプルを使用します。
私の学習を兼ねてサンプルコードを少し深堀して書きますので参考にどうぞ。
実行環境
本記事の実行環境です。
- OS:Windows 10
- intel RealSense D435i
- OpenCV Ver.4.10.0
- Python Ver.3.11
- pyrealsense2 Ver.2.55.1
インストール方法は以下です
pip install pyrealsense2サンプルコードおよび取得したカラー・深度画像
以下、サンプルコードです。
## License: Apache 2.0. See LICENSE file in root directory.
## Copyright(c) 2015-2017 Intel Corporation. All Rights Reserved.

###############################################
##      Open CV and Numpy integration        ##
###############################################

import pyrealsense2 as rs
import numpy as np
import cv2

# Configure depth and color streams
pipeline = rs.pipeline()
config = rs.config()

# Get device product line for setting a supporting resolution
pipeline_wrapper = rs.pipeline_wrapper(pipeline)
pipeline_profile = config.resolve(pipeline_wrapper)
device = pipeline_profile.get_device()
device_product_line = str(device.get_info(rs.camera_info.product_line))

found_rgb = False
for s in device.sensors:
    if s.get_info(rs.camera_info.name) == 'RGB Camera':
        found_rgb = True
        break
if not found_rgb:
    print("The demo requires Depth camera with Color sensor")
    exit(0)

config.enable_stream(rs.stream.depth, 640, 480, rs.format.z16, 30)
config.enable_stream(rs.stream.color, 640, 480, rs.format.bgr8, 30)

# Start streaming
pipeline.start(config)

try:
    while True:

        # Wait for a coherent pair of frames: depth and color
        frames = pipeline.wait_for_frames()
        depth_frame = frames.get_depth_frame()
        color_frame = frames.get_color_frame()
        if not depth_frame or not color_frame:
            continue

        # Convert images to numpy arrays
        depth_image = np.asanyarray(depth_frame.get_data())
        color_image = np.asanyarray(color_frame.get_data())

        # Apply colormap on depth image (image must be converted to 8-bit per pixel first)
        depth_colormap = cv2.applyColorMap(cv2.convertScaleAbs(depth_image, alpha=0.03), cv2.COLORMAP_JET)

        depth_colormap_dim = depth_colormap.shape
        color_colormap_dim = color_image.shape

        # If depth and color resolutions are different, resize color image to match depth image for display
        if depth_colormap_dim != color_colormap_dim:
            resized_color_image = cv2.resize(color_image, dsize=(depth_colormap_dim[1], depth_colormap_dim[0]), interpolation=cv2.INTER_AREA)
            images = np.hstack((resized_color_image, depth_colormap))
        else:
            images = np.hstack((color_image, depth_colormap))

        # Show images
        cv2.namedWindow('RealSense', cv2.WINDOW_AUTOSIZE)
        cv2.imshow('RealSense', images)
        cv2.waitKey(1)

finally:

    # Stop streaming
    pipeline.stop()
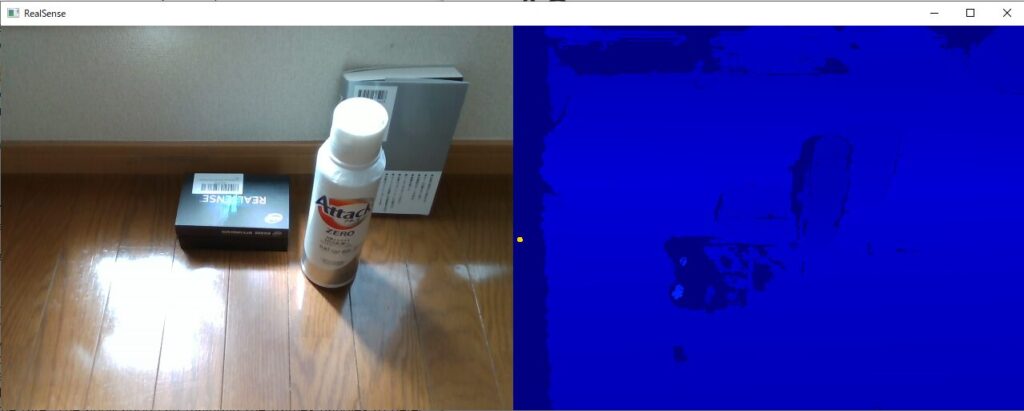
上記プログラムを実行すると、下記のようにカラー画像と深度画像が取得できます。

サンプルコードを深堀してみる
import pyrealsense2 as rs
import numpy as np
import cv2
必要なモジュールを呼び出します
- pyrealsense2
IntelのDepthカメラRealsenseをPythonで扱うためのラッパープログラムです。Pythonで、Realsenseの画像や深度情報を簡単に取得することができます。 - numpy
Pythonによる科学技術計算の基礎パッケージ - cv2(OpenCV)
画像処理ライブラリ
# Configure depth and color streams
pipeline = rs.pipeline()
config = rs.config()- pipeline = rs.pipeline()
pipelineクラスからインスタンスを生成します。
pipelineはカメラの設定・ストリーミングなどを制御するクラスです。 - config = rs.config()
configクラスからインスタンスを生成します。
カメラに対して撮影・データ取得の設定を行うためのクラスです。
# Get device product line for setting a supporting resolution
pipeline_wrapper = rs.pipeline_wrapper(pipeline)
pipeline_profile = config.resolve(pipeline_wrapper)
device = pipeline_profile.get_device()
device_product_line = str(device.get_info(rs.camera_info.product_line))- pipeline_wrapper = rs.pipeline_wrapper(pipeline)
pipeline_wrapperクラスからインスタンスとしてpipeline_wrapperを生成します。 - pipeline_profile = config.resolve(pipeline_wrapper)
configクラスのresolveメソッドにより、上記で定義したpipeline_wrapperを引数として
戻り値pyrealsense2.pipeline_profileをpipeline_profileに代入します。
pipeline_profileクラスは、デバイスと特定のプロファイルを持つアクティブなストリームの選択肢の情報が内包されています。 - device = pipeline_profile.get_device()
pipeline_profileクラスのメソッドget_deviceにより、パイプラインが使用するデバイスを取得します。戻り値pyrealsense2.deviceをdeviceに代入します。 - device_product_line = str(device.get_info(rs.camera_info.product_line))
- rs.camera_info.product_line
camera_infoクラスは、各種カメラ情報を取得できます。属性product_lineについてドキュメントに説明はありませんでした。 - device.get_info
pyrealsense2.deviceクラスのメソッドget_infoにより、camera_infoを引数として戻り値を文字列として返します(str()で囲む必要あるのか?)。この文字列をdevice_product_lineに代入します。
- rs.camera_info.product_line
found_rgb = False
for s in device.sensors:
    if s.get_info(rs.camera_info.name) == 'RGB Camera':
        found_rgb = True
        break
if not found_rgb:
    print("The demo requires Depth camera with Color sensor")
exit(0)- found_rgb = False
found_rgbは、接続したセンサがRGBカメラかどうかを判定するトリガーです。ここでは、Falseで初期化しています。 - for s in device.sensors:
device(pyrealsense2.device)の属性sensorsは、接続したカメラのデバイスのリストを戻り値として返します。メソッドquery_sensorsと同じです。 - if s.get_info(rs.camera_info.name) == ‘RGB Camera’
pyrealsense2.sensorクラスのget_infoメソッドは、引数にpyrealsense2.camera_infoを設定することにより、戻り値としてカメラ固有の情報を取得できます。
ここでは、接続したカメラが ‘RGBカメラ’ であれば、found_rgb=Trueを実行し、breakでif分を抜けます。 - if not found_rgb: 以降
上記for文内で、接続したカメラがRGBカメラでなければ、メッセージを出力し、exit関数でプログラムを強制的に終了します。
config.enable_stream(rs.stream.depth, 640, 480, rs.format.z16, 30)
config.enable_stream(rs.stream.color, 640, 480, rs.format.bgr8, 30)- config.enable_stream(-)
pyrealsense2.configのメソッドenable_streamは、受信したい映像設定を引数として設定することにより、特定の構成を持つストリームをカメラに要求します。- 第一引数:pyrealsense2.stream
ストリームとは、RealSenseデバイスが提供する様々な種類のデータです。
一行目では属性depthによりdepth情報を取得可能なストリーム、二行目では一行目では属性colorによりcolor情報を取得可能なストリームとして設定します。 - 第二・第三引数:width,height
受信する映像の画素数を水平方向(width)と垂直方向(height)により設定します。 - 第四引数:pyrealsense2.format
バイナリデータのエンコード設定です。一行目では深度情報用のフォーマット、二行目はカラー画像用のフォーマットを指定していると考えられます。 - 第五引数:framerate(int)
フレームレイト(一秒間あたりのフレーム数)を指定します。両方とも30[fps]で指定しています。
- 第一引数:pyrealsense2.stream
# Start streaming
pipeline.start(config)pyrealsense2.pipelineクラスのstartメソッドにより、今まで設定したconfigを引数として設定情報を渡し、ストリーミングを開始します。
try:
    while True:

        # Wait for a coherent pair of frames: depth and color
        frames = pipeline.wait_for_frames()
        depth_frame = frames.get_depth_frame()
        color_frame = frames.get_color_frame()
        if not depth_frame or not color_frame:
continue- frames = pipeline.wait_for_frames()
pyrealsense2.pipelineクラスのwait_for_framesメソッドは、新しいフレームセットが利用可能ななるまで待ち、戻り値としてpyrealsense2.composite_frameを出力します。本プログラムでは戻り値をframesに代入しています。 - depth_frame = frames.get_depth_frame()、color_frame = frames.get_color_frame()
pyrealsense2.composite_frameクラスのget_depth_frameメソッドにより、深度関連の属性と関数を制御するpyrealsense2.depth_frameクラスをdepth_frameにインスタンス化します。
同様に、pyrealsense2.composite_frameクラスのget_color_frameメソッドにより、ビデオ関連の属性と関数を制御するpyrealsense2.video_frameクラスをcolor_frameにインスタンス化します。 - if not depth_frame or not color_frame: continue
depth_frameとcolor_frameがbool型のfolseであるときのみ、contiuneを実行してその後の処理をスキップします。例外処理です。
# Convert images to numpy arrays
depth_image = np.asanyarray(depth_frame.get_data())
color_image = np.asanyarray(color_frame.get_data())- depth_image = np.asanyarray(depth_frame.get_data())
pyrealsense2.depth_frameクラスのget_dataメソッドによりデータを取得します。
numpy.asanyarray()関数は、入力されたデータをNumPyのndarrayオブジェクトに変換する関数です。depthデータを上記関数によりデータ型ndarrayに変換し、depth_imageに代入します。 - color_image = np.asanyarray(color_frame.get_data())
pyrealsense2.video_frameクラスのget_dataメソッドによりデータを取得します。
colorデータを引数として、numpy.asanyarray()関数により、データ型ndarrayに変換し、color_imageに代入します。
# Apply colormap on depth image (image must be converted to 8-bit per pixel first)
depth_colormap = cv2.applyColorMap(cv2.convertScaleAbs(depth_image, alpha=0.03), cv2.COLORMAP_JET)- cv2.convertScaleAbs(入力画像,alpha,beta):参考サイト
引数
| 名称 | |
| 入力画像(必須) | 入力画像データ |
| alpha(オプション) | スケールファクター(コントラスト)、1.0で変化なし。 |
| beta(オプション) | スケーリングされた値に加算される値(明るさ)、0.0で変化なし。 |
戻り値:変更後の画像データ(ndarray)
- cv2.applyColorMap(src,colormap[, dst]) ->dst
入力画像srcにカラーマップを適用することで、画素値に対応した色を割り当てることができます。
カラーマップの種類は引数colormapで指定可能です。これにより、depth_colormapに深度情報をカラーマップに変換した画像データを格納します。
depth_colormap_dim = depth_colormap.shape
color_colormap_dim = color_image.shapenumpy.ndarrayクラスの属性shapeは配列の次元を返します。depth_colormap_dimおよびcolor_colormap_dimに対して、depth画像のカラーマップの配列、カラー画像の配列の次元を代入しています。
 # If depth and color resolutions are different, resize color image to match depth image for display
if depth_colormap_dim != color_colormap_dim:
    resized_color_image = cv2.resize(color_image, dsize=(depth_colormap_dim[1],
                                       depth_colormap_dim[0]), interpolation=cv2.INTER_AREA)
    images = np.hstack((resized_color_image, depth_colormap))
else:
    images = np.hstack((color_image, depth_colormap))
ここでは、深度画像とカラー画像の解像度(配列次元)が異なる場合、深度画像に合わせてカラー画像をリサイズします。
- cv.resize( src, dsize[, dst[, fx[, fy[, interpolation]]]] ) -> dst
画像をリサイズします。color画像を変更する対象画像srcとして指定し、dsizeを変更後の画像サイズとして指定します。interpolationは補間アルゴリズムの種類を指定します。 - numpy.hstack
配列を水平方向(列方向)に順番に積み重ねるメソッドです。カラー画像と深度画像を水平方向に並べ、一つのnumpy.ndarray配列画像としてimageに代入します。
 # Show images
        cv2.namedWindow('RealSense', cv2.WINDOW_AUTOSIZE)
        cv2.imshow('RealSense', images)
        lastkey = cv2.waitKey(1)

        if lastkey==ord("q"):
break- cv.namedWindow( winname[, flags] ) -> None
画像表示ウインドウを生成します。引数として、str型でウィンドウ名を指定し、生成されたウインドはこのウインド名で参照されます。第二引数はウインド生成方法を指定するフラグであり、cv2.WINDOW_AUTOSIZEは表示される画像に合わせてウインドサイズを自動的に調整します。 - cv.imshow( winname, mat ) -> None
指定したウインドに画像を表示します。上記で生成した”RealSense”を指定し、カラー画像と深度画像が水平方向に結合された配列imagesを表示します。 - lastkey = cv2.waitKey(1) if lastkey==ord(“q”): break
入力されたキーがqであればプログラムを終了します。
finally:

    # Stop streaming
    print("stop streaming.")
    pipeline.stop()
プログラム終了時にpipeline.stop()によりカメラストリーミングを終了します。

まとめ
本記事は、intel RealSenseとサンプルコードを使用して、カラー画像と深度画像を取得しました。
さらに、サンプルコードを深堀しました。
次は、画像や点群データの保存を実行したいと思います。
合わせて読みたい
- Intel RealSense + Open3D + Pythonで取得した点群情報を.ply形式で保存する
- .ply形式で保存した点群・テキスチャデータをPythonとOpen3dで表示する
- Open3DとPythonを使用したICPによる点群の位置合わせ
参考サイト
- 【Windows11】Python で RealSenseD435 を起動+チュートリアル
- pyrealsense2’s documentation
- 【Python・OpenCV】画像のコントラストと明るさを変更するには
社内外で評価されるエンジニアになる、ひいてはエンジニア人生を楽しくするためには、
日常のインプットとアウトプットの重要性が日に日に増していることを実感しています。
そのなかで、私は「書籍による学習」と「ブログによるアウトプット」を強くおすすめしております。
その重要性や効果の実感をブログに書いてみましたので、参考にしていただければ幸いです。


